1) WEST ( wood epoxy saturation technique) epoxy Z105 two parts mix, Part A the resin; Part B the catalyst at a ratio of 4:1. The pump we used squirts the correct ratio for us otherwise we use a scale to get the ratio correct.
2)ADR two part epoxy resin ( ADR and ADH). Requires post curing to achieve best hardness.The main hardener, ADH341, offers pot-lives up to 24 hours, working times of up to 72 hours and requires curing temperatures in excess of 50º C under vacuum.
3)Various types of "thixatrope" were also used in different areas of the boat as I'll explain. To cove in joins on the inside we used an WEST epoxy blend with the thixatrope colloidal silica 411, a lightwight microsphere blend which makes a think white paste. It is easily workable when 200ml of 411 are mixed with 2 pumps of epoxy, making a viscosity like soft ice-cream.
4) The other thixatrope we used was gap filler microfibre blend 403 we used to fill holes and cove in joins.
The mixture we used to bond the deck to the hull was a "Rubberised" epoxy. Two parts of HPR25a and HPR25b mixed together at a 4:1 ration making a strong structural adhesive.
For the deck and exterior of the yacht ADR epoxy was used. This range of resins and hardeners developed with unique chemistry makes them suitable for building simple room temperature curing e glass structures along with high temperature post cured carbon laminates.
With superior mechanical properties and wet-out characteristics, ADR resins and hardeners have become the preferred systems for large, high flow laminations requiring reliable cure and long working times. Designed largely for laminating only, ADR resins and hardeners produce stronger, stiffer and tougher laminates.
Sealing bag to transom. Chris cut a slice off the transom to try make a seal since resin was poured all over the place and dripped down the transom and under the masking tape which was used to attempt to protect the perimeter where the vac tape needed to go.
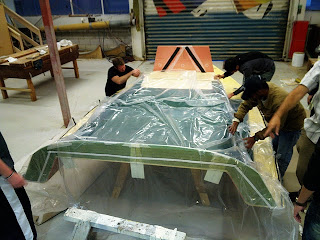
Sealing "stack" to decks underside
Pressure Gauge showing a 100% seal at -100kPa (1 atmosphere of pressure)
Air works the same way. The atmoshere is about 50 miles "deep," and at sea level it exerts 14.7 psi. That is, a 1-inch-square column of air 50 miles high weighs 14.7 pounds. Our bodies think 14.7 psi of air pressure is completely normal.
Air works the same way. The atmoshere is about 50 miles "deep," and at sea level it exerts 14.7 psi. That is, a 1-inch-square column of air 50 miles high weighs 14.7 pounds. Our bodies think 14.7 psi of air pressure is completely normal.
Vacuum valve with four inlets, ones not used are clamped shut.
Foredeck underside being vacuum bagged.
See this video of a bagging complication. Holes are frequently a problem when trying to seal the bag.
http://youtu.be/LHtY3QTVMFg
See this video of a bagging complication. Holes are frequently a problem when trying to seal the bag.
http://youtu.be/LHtY3QTVMFg
EDB (double bias) 240g/m2 fibre-glass matt
Shade cloth mesh
Plastic sheet 4m wide
Roll of rubberized bitumen vacuum tape
LAMINTAING PREPARATION:
The stack is layered as such:Plastic sheet 4m wide
Roll of rubberized bitumen vacuum tape
LAMINTAING PREPARATION:
-Ensure the surface is dirt free and any holes filled.
-Sand a 50mm rebate where the F.G. cloth will overlap.
-Use masking tape around edges where the vac tape will go. It is essential this area is kept free of contaminates, e.g. resin, dust, material fibres. Masking tape also creates a visible boundary to work to.
-Pour 4-5 pumps of WEST Z105 Epoxy into clean container and stir for 1-2 minutes taking note of the time as the pot-life (working time) of the resin is limited to 1 hour. As the catalytic process is an exothermic chemical reaction we must be carefull not to make too much resin at one time, as this speeds the gell-time considerably.
-Now begin making the stack with the steps as followed...
1 )First the area to glass is saturated with resin with a paint roller
2) Let saturated area cure, then de-nib with 40 grit and etch the surface so next layers bond well.
3) The fibre-glass matt with centre marked on it laid from the middle out to prevent wrinkles in the cloth with spreaders and roller.
4) Then the cloth is wetted through from the middle outwards forcing the air and bubbles out to the edges.
5) Peel-ply laid on top of F.G. cloth in the same manner working wrinkles and air pockets outwards.
6) Perforated plastic covers the stack to aid in the separation of the mesh and the holes let excess resin through.
7) Shade cloth mesh covers the stack to soak up excess resin and allow air to flow out to vacuum pump.
8) Finally the plastic sheet covers the stack and sealed with bitumen vacuum tape around the perimeter of glassed area.


A good blog posting.
ReplyDeleteThis shows me that you have a good grasp of the process of vacuuming. Good also to see the link to the Transom task.
Check your atmosphere pressure statement... 50 miles is too deep
ReplyDelete